Using jQuery To Create Stunning Tooltips in your ASP.NET Applications
“jQuery Tools is a collection of the most important user interface components for the web. These are tabs and accordions, tooltips, overlays, exposing effects and scrollables. They can dramatically improve the usability and responsiveness of your site. They mainly focus on presenting information and visual appeal. After all, this is exactly what most websites desperately want: to present their content to the reader in an easy and visually pleasing manner.”
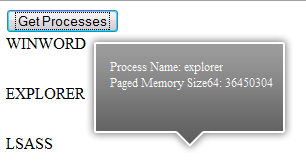
I’ll be focusing some future articles on these tools, but this article will concentrate on how to create stunning tooltips using this plugin. The end result in this article will show you how to create these tooltips using dynamic data by using jQuery’s Ajax functionality. The end result will look something like this:
Before we get started, this example uses the latest version of jQuery which is 1.3.2. That can be downloaded from here. The jQuery Tools and can be downloaded from here.
The jQuery Tools plugin has quite a few options when it comes time to configuration, but the one you should not forget is the tip attribute. This jQuery selector selects the tooltip element being used. The attribute that will allow you to position the tooltip is funnily enough called position. The position property specifies the position in relation to the trigger element. For example, a value of 'bottom center' will place the tooltip on the bottom edge of the trigger, centred horizontally. Other values are:
-
top center, top right, center right, bottom right, bottom left, center left and top left
To make this real, instead of showing this tooltip against static data such as images, I’m going to use jQuery’s Ajax functionality to query the server for a list of running processes. Okay let’s gets started. Open Visual Studio 2008 and create a new Web Application. First off add a new class to the project and call it ProcessInfo. This class will hold information about the process. Add the following code to the class:
C#
public class ProcessInfo
{
public string ProcessName { get; set; }
public string MainWindowTitle { get; set; }
public long PagedMemorySize64 { get; set; }
}
VB.NET
Public Class ProcessInfo
Private privateProcessName As String
Public Property ProcessName() As String
Get
Return privateProcessName
End Get
Set(ByVal value As String)
privateProcessName = value
End Set
End Property
Private privateMainWindowTitle As String
Public Property MainWindowTitle() As String
Get
Return privateMainWindowTitle
End Get
Set(ByVal value As String)
privateMainWindowTitle = value
End Set
End Property
Private privatePagedMemorySize64 As Long
Public Property PagedMemorySize64() As Long
Get
Return privatePagedMemorySize64
End Get
Set(ByVal value As Long)
privatePagedMemorySize64 = value
End Set
End Property
End Class
The next step is to open the Default.aspx.cs file and add the following code:
C#
[WebMethod]
public static List<ProcessInfo> GetRunningProcesses()
{
var query = (from p in System.Diagnostics.Process.GetProcesses()
select new ProcessInfo
{
ProcessName = p.ProcessName,
MainWindowTitle = p.MainWindowTitle,
PagedMemorySize64 = p.PagedMemorySize64
}).ToList();
return query;
}
VB.NET
Public Shared Function GetRunningProcesses() As List(Of ProcessInfo)
Dim query = ( _
From p In System.Diagnostics.Process.GetProcesses() _
Select New ProcessInfo With {.ProcessName = p.ProcessName, .MainWindowTitle = p.MainWindowTitle, .PagedMemorySize64 = p.PagedMemorySize64}).ToList()
Return query
End Function
The code above will be called by jQuery’s Ajax function. It returns a list of running process on the machine thanks to the Process object. The Process class provides access to local and remote processes. The LINQ query will return a generic list of ProcessInfo objects that will be used to create the tooltips. The next step is to add the JavaScript. Open the Default.aspx page and add the following jQuery code to the section of the page. Ideally JavaScript should go to a separate .js file, however for this example; I’ll keep it in the same page:
<script language="javascript" type="text/javascript" src="Scripts/jquery-1.3.2.js">script>
<script language="javascript" type="text/javascript" src="http://cdn.jquerytools.org/1.1.1/jquery.tools.min.js">script>
<script language="javascript" type="text/javascript">
function showToolTip() {
$("#results span[title]").tooltip({
position: "center right",
opacity: 0.7,
tip: "#demotip",
effect: "fade"
});
}
$(document).ready(function() {
$("#btnSearch").click(function() {
$.ajax({
type: "POST",
url: "Default.aspx/GetRunningProcesses",
data: "{}",
contentType: "application/json; charset=utf-8",
dataType: "json",
async: true,
success: function(msg) {
var processInfo = msg.d;
$("#results").text("");
for (var i = 0; i < processInfo.length; i++) {
// create the title for each item
var title = "Process Name: " +
processInfo[i].ProcessName +
"<BR>" +
"Paged Memory Size64: " +
processInfo[i].PagedMemorySize64;
$("#results").append("">" +
processInfo[i].ProcessName +
"
");
");
}
}
});
});
});
script>
In the code above I am binding to the input button’s click event. When the user clicks the button, it will execute the WebMethod GetRunningProcesses. A generic list containing the ProcessInfo data will be returned in the msg.d argument. For each process returned, a span tag will be appended in the div element. When the user hover’s their mouse over the tag, the JavaScript function showToolTip will run. This function is responsible for displaying the tooltip:
function showToolTip() {
$("#results span[title]").tooltip({
position: "center right",
opacity: 0.7,
tip: "#demotip",
effect: "fade"
});
}
Using jQuery’s selectors the tooltip will find the related span tag to trigger the tooltip. The tool looks for the element that is placed next to the tooltip to be the tooltip. The return value is a jQuery object associated with the selection. The result is a stunning tooltip as the screen shot below shows:
The information in the tooltip can be configured as it’s just HTML. So if you want you can display a nice image to the user so they’ll be able to associate the process by the icon. The background image of the tooltip is configurable too. The styling for the tooltip is below:
#demotip {
display:none;
background:transparent url(http://flowplayer.org/tools/img/tooltip/black_arrow.png);
font-size:12px;
height:70px;
width:160px;
padding:25px;
color:#fff;
}
This is a nice addition to your jQuery ensemble. The entire source code of this article can be downloaded over here
No comments:
Post a Comment