Tuesday, October 13, 2009

Prevent Cut, Copy and Paste Operations in an ASP.NET TextBox using jQuery


Prevent Cut, Copy and Paste Operations in an ASP.NET TextBox using jQuery
 
In this short article, I will demonstrate how to prevent users from doing Cut, Copy and Paste operations in an ASP.NET TextBox using jQuery. This article is a sample chapter from my upcoming EBook called 51 Tips, Tricks and Recipes with jQuery and ASP.NET Controls. The chapter content has been modified to publish it as an article. Also please note that for demonstration purposes, I have included JavaScript into the same file. Ideally, these resources should be created in separate folders for maintainability.
The event handling approach in jQuery begins by attaching a handler to an event. The jQuery bind() event method does exactly the same and binds one or more events to a handler. The signature of the bind() method is as follows:
bind(eventType,data,handler)
The parameters of the bind() method are as follows:
eventType is a string holding a JavaScript event type such as click, focus, keyup etc.
data is some optional data you want to pass to the handler
handler is the event handler function which will execute when the event is triggered
Let us quickly jump to the solution and see how we can use the bind() event method to write minimal code to prevent cut, copy and paste operations on the textbox.
<html xmlns="http://www.w3.org/1999/xhtml">
<head id="Head1" runat="server">
    <title>Prevent Cut, Copy and Paste Operations in a TextBoxtitle>
    <script type='text/javascript'
    src='http://jqueryjs.googlecode.com/files/jquery-1.3.2.min.js'>
    script>
   
    <script type="text/javascript">
        $(function() {
        $('input[id$=tb1]').bind('cut copy paste'function(e) {
                e.preventDefault();
                alert('You cannot ' + e.type + ' text!');
            });
        });
    script>
head>
<body>
    <form id="form1" runat="server">
    <div class="bigDiv">
        <h2>Prevent Cut, Copy and Paste Operations in a TextBoxh2>
        <asp:TextBox ID="tb1" runat="server"
            Text="Text which cannot be copied/cut/pasted" 
            ToolTip="Try Copy/Cut/Paste in textbox"/>       
    div>
    form>
body>
html>
Observe how convenient it is to use jQuery to list multiple events (cut, copy, paste) together and bind it to a handler as shown below.  
$('input[id$=tb1]').bind('cut copy paste'function(e) {});
 
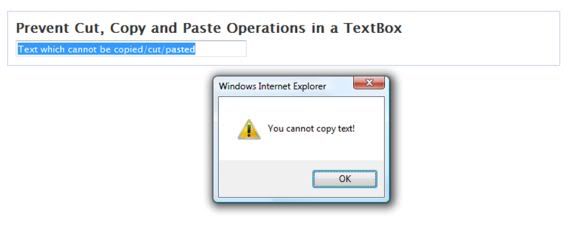
If the user performs any of these events on the textbox (tb1), the default behavior is prevented using e.preventDefault() and the user is alerted with a message. The e.type describes the type of event performed.
$('input[id$=tb1]').bind('cut copy paste'function(e) {
      e.preventDefault();
      alert('You cannot ' + e.type + ' text!');
});
 
CutCopyPaste
This piece of ‘minimal’ code handles a typical requirement where you are asked to ‘confirm’ an email address and want the user to type it manually, instead of copying and pasting it.
Note: Text can be edited in this textbox, but cut/copy/paste actions are prevented
This demo has been tested on IE7, IE8, Firefox 3, Chrome 2 and Safari 4.

Thursday, October 8, 2009

Limit Number Of Characters In an ASP.NET Multiline TextBox using jQuery

Limit Number Of Characters In an ASP.NET Multiline TextBox using jQuery
 
This article shows you how to limit characters entered in an ASP.NET Multiline TextBox. The ASP.NET Multiline TextBox ignores the MaxLength property. So one of the ways of solving this requirement is to use Client Script and detect if the maximum character limit of the Multiline TextBox has been reached. I will be showing a common technique adopted by developers to solve this requirement. I will then explain why this technique is not user friendly and how to improve on it.
This article is a sample chapter from my upcoming EBook called 51 Tips, Tricks and Recipes with jQuery and ASP.NET Controls. The chapter content has been modified to publish it as an article. Also please note that for demonstration purposes, I have included both the JavaScript and CSS into the same file. Ideally, these resources should be created in seperate folders for maintainability.
A common technique adopted by developers is to capture the textbox keyup event and calculate the number of characters in the textbox, as the user types in it. If the character exceeds the limit of the textbox (in our case 50 characters), the additional characters entered by the user is disallowed.  The code is as shown below:
<html xmlns="http://www.w3.org/1999/xhtml">
<head id="Head1" runat="server">
    <title>Limit Characters in a Multiline TextBoxtitle>
    <script type='text/javascript'
    src='http://jqueryjs.googlecode.com/files/jquery-1.3.2.min.js'>
    script>
 
    <script type="text/javascript">
        $(function() {
            var limit = 50;
 
            $('textarea[id$=tb1]').keyup(function() {
                var len = $(this).val().length;
                if (len > limit) {
                    this.value = this.value.substring(0, limit);
                }
                $('#spn).text(limit - len + " characters left");
            });
        });
    script>
head>
<body>
    <form id="form1" runat="server">
    <div>
        <asp:TextBox ID="tb1" runat="server" TextMode="MultiLine"/><br /> 
        <span id="spn ">span>     
    div>
    form>
body>
html>
Observe how we are selecting the control using textarea in the code shown above $('textarea[id$=tb1]'). This is as the ASP.NET Multiline TextBox renders as a textarea.
Although the solution given above restricts the user from entering more than 50 characters, this behavior can be confusing for users who may not realize that they have reached the TextBox limit. Instead of disallowing extra characters, a slick way of handling this requirement would be to visually indicate to the user when the textbox limit has been exceeded. Then before submitting the form, give the user a chance to remove the extra text. The code shown below changes the background color of the textbox to red when the textbox limit is exceeded. The user is also prevented from submitting the form.
<html xmlns="http://www.w3.org/1999/xhtml">
<head id="Head1" runat="server">
    <title>Limit Characters in a Multiline TextBoxtitle>
    <script type='text/javascript'
    src='http://jqueryjs.googlecode.com/files/jquery-1.3.2.min.js'>
    script>
    <style type="text/css">
    .exceeded{
        background-color:red;
    }
    style>
   
    <script type="text/javascript">
        $(function() {
            var limit = 50;
            var tb = $('textarea[id$=tb1]');
            $(tb).keyup(function() {
                var len = $(this).val().length;
                if (len > limit) {
                    //this.value = this.value.substring(0, 50);
                    $(this).addClass('exceeded');
                    $('#spn').text(len - limit + " characters exceeded");
                }
                else {
                    $(this).removeClass('exceeded');
                    $('#spn').text(limit - len + " characters left");
                }
            });
 
            $('input[id$=btnSubmit]').click(function(e) {
                var len = $(tb).val().length;
                if (len > limit) {
                    e.preventDefault();
                }
            });
        });
    script>
head>
<body>
    <form id="form1" runat="server">
    <div class="smallDiv">
        <h2>Type into this textbox which accepts 50 characters overallh2>
        <asp:TextBox ID="tb1" runat="server" TextMode="MultiLine"/><br />
        (This textbox accepts only 50 characters) <br />
        <span id="spn">span> <br />
        <asp:Button ID="btnSubmit" runat="server" Text="Submit"/>
        <span id="error">span>
        <br /><br />
        Tip: Clicking on the Submit button when number of characters are
        less than 50, results in a postback to same page. If you exceed 50
        characters, the exceeded characters are printed below the textbox
        and a postback is prevented.
    div>
    form>
body>
html>
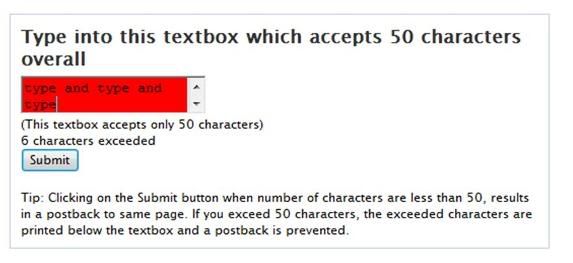
When the number of characters exceeds the textbox limit, we add the exceeded class to the textbox, which turns the textbox background to red, indicating the user that the limit has been exceeded. The result is shown here:
LimitExceeded
When the user tries and submits the form now, the length of the TextBox is calculated and the user is prevented from submitting the form, since the textbox exceeds the permissible length. 
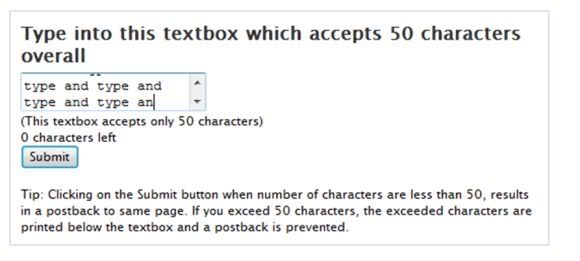
When the user removes the extra text, the exceeded class is removed. The result is shown here:
RemoveExceeded
The form can now be submitted. You can see a Live Demo here . This demo has been tested on IE7, IE8, Firefox 3, Chrome 2 and Safari 4.

Tuesday, October 6, 2009

Using jQuery To Create Stunning Tooltips in your ASP.NET Applications

Using jQuery To Create Stunning Tooltips in your ASP.NET Applications


jQuery Tools is a collection of the most important user interface components for the web. These are tabs and accordions, tooltips, overlays, exposing effects and scrollables. They can dramatically improve the usability and responsiveness of your site. They mainly focus on presenting information and visual appeal. After all, this is exactly what most websites desperately want: to present their content to the reader in an easy and visually pleasing manner.
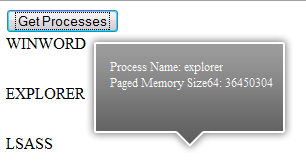
I’ll be focusing some future articles on these tools, but this article will concentrate on how to create stunning tooltips using this plugin. The end result in this article will show you how to create these tooltips using dynamic data by using jQuery’s Ajax functionality. The end result will look something like this:
ToolTip
Before we get started, this example uses the latest version of jQuery which is 1.3.2. That can be downloaded from here. The jQuery Tools and can be downloaded from here
The jQuery Tools plugin has quite a few options when it comes time to configuration, but the one you should not forget is the tip attribute. This jQuery selector selects the tooltip element being used. The attribute that will allow you to position the tooltip is funnily enough called position. The position property specifies the position in relation to the trigger element. For example, a value of 'bottom center' will place the tooltip on the bottom edge of the trigger, centred horizontally. Other values are:

  • top center, top right, center right, bottom right, bottom left, center left and top left

To make this real, instead of showing this tooltip against static data such as images, I’m going to use jQuery’s Ajax functionality to query the server for a list of running processes. Okay let’s gets started. Open Visual Studio 2008 and create a new Web Application. First off add a new class to the project and call it ProcessInfo. This class will hold information about the process. Add the following code to the class:
C#
public class ProcessInfo
{
public string ProcessName { get; set; }
      public string MainWindowTitle { get; set; }
      public long PagedMemorySize64 { get; set; }
}
VB.NET
Public Class ProcessInfo
Private privateProcessName As String
Public Property ProcessName() As String
      Get
            Return privateProcessName
      End Get
      Set(ByVal value As String)
            privateProcessName = value
      End Set
End Property
       Private privateMainWindowTitle As String
       Public Property MainWindowTitle() As String
             Get
                   Return privateMainWindowTitle
             End Get
             Set(ByVal value As String)
                   privateMainWindowTitle = value
             End Set
       End Property
       Private privatePagedMemorySize64 As Long
       Public Property PagedMemorySize64() As Long
             Get
                   Return privatePagedMemorySize64
             End Get
             Set(ByVal value As Long)
                   privatePagedMemorySize64 = value
             End Set
       End Property
End Class
The next step is to open the Default.aspx.cs file and add the following code:
C#
[WebMethod]
public static List<ProcessInfo> GetRunningProcesses()
{
var query = (from p in System.Diagnostics.Process.GetProcesses()
                  select new ProcessInfo
                  {
                        ProcessName = p.ProcessName,
                        MainWindowTitle = p.MainWindowTitle,
                        PagedMemorySize64 = p.PagedMemorySize64                            
}).ToList();
return query;
} 
VB.NET
_
Public Shared Function GetRunningProcesses() As List(Of ProcessInfo)
Dim query = ( _
    From p In System.Diagnostics.Process.GetProcesses() _
    Select New ProcessInfo With {.ProcessName = p.ProcessName, .MainWindowTitle = p.MainWindowTitle, .PagedMemorySize64 = p.PagedMemorySize64}).ToList()
Return query
End Function
The code above will be called by jQuery’s Ajax function. It returns a list of running process on the machine thanks to the Process object. The Process class provides access to local and remote processes. The LINQ query will return a generic list of ProcessInfo objects that will be used to create the tooltips. The next step is to add the JavaScript. Open the Default.aspx page and add the following jQuery code to the section of the page. Ideally JavaScript should go to a separate .js file, however for this example; I’ll keep it in the same page:
<script language="javascript" type="text/javascript" src="Scripts/jquery-1.3.2.js">script>
<script language="javascript" type="text/javascript" src="http://cdn.jquerytools.org/1.1.1/jquery.tools.min.js">script>
    <script language="javascript" type="text/javascript">
        function showToolTip() {           
            $("#results span[title]").tooltip({
                position: "center right",     
                opacity: 0.7,
                tip: "#demotip",
                effect: "fade"
            });           
        }

        $(document).ready(function() {
            $("#btnSearch").click(function() {
                $.ajax({
                    type: "POST",
                    url: "Default.aspx/GetRunningProcesses",
                    data: "{}",
                    contentType: "application/json; charset=utf-8",
                    dataType: "json",
                    async: true,
                    success: function(msg) {
                        var processInfo = msg.d;
                        $("#results").text("");
                        for (var i = 0; i < processInfo.length; i++) {
                            // create the title for each item
                            var title = "Process Name: " +
                                        processInfo[i].ProcessName +
                                        "<BR>" +
                                        "Paged Memory Size64: " +
                                        processInfo[i].PagedMemorySize64;                           
                            $("#results").append("">" +
                            processInfo[i].ProcessName +
                            "

"
);
                        }
                    }
                });
            });
        });   
    script>

In the code above I am binding to the input button’s click event. When the user clicks the button, it will execute the WebMethod GetRunningProcesses. A generic list containing the ProcessInfo data will be returned in the msg.d argument. For each process returned, a span tag will be appended in the div element. When the user hover’s their mouse over the tag, the JavaScript function showToolTip will run. This function is responsible for displaying the tooltip:
function showToolTip() {           
$("#results span[title]").tooltip({
position: "center right",     
            opacity: 0.7,
            tip: "#demotip",
            effect: "fade"
      });           
}
Using jQuery’s selectors the tooltip will find the related span tag to trigger the tooltip. The tool looks for the element that is placed next to the tooltip to be the tooltip. The return value is a jQuery object associated with the selection.   The result is a stunning tooltip as the screen shot below shows:
ToolTip
The information in the tooltip can be configured as it’s just HTML. So if you want you can display a nice image to the user so they’ll be able to associate the process by the icon. The background image of the tooltip is configurable too. The styling for the tooltip is below:

#demotip {
          display:none;
          background:transparent url(http://flowplayer.org/tools/img/tooltip/black_arrow.png);
          font-size:12px;
          height:70px;
          width:160px;
          padding:25px;
          color:#fff;    
}

This is a nice addition to your jQuery ensemble. The entire source code of this article can be downloaded over here

Friday, October 2, 2009

Error Logging using ASP.NET 2.0

Error Logging using ASP.NET 2.0
 
This article has been republished with a few minor changes.
Errors and failures may occur during development and operation of a website. ASP.NET 2.0 provides tracing, instrumentation and error handling mechanisms to detect and fix issues in an application.
In this article, we will adopt a simple mechanism to log errors and exceptions in our website. We will be using a mechanism where the user will be redirected to a separate page whenever an error is encountered in the application. Simultaneously, the error will get logged in a text file on the server. The error file will be created on a daily basis, whenever the error is encountered. Having said that, let us now see some code.
Step 1: Start by creating an Error folder where all errors will be logged. Right click the website > New Folder. Rename the folder to “Error”. Also add a web.config file, if one does not already exist in your site. Right click the website > Add New Item > Web.config.
Step 2: Now we will create the error handler code. To do so, right click your website > Add New Item > select Class. Rename the class to ‘ErrHandler.cs’ and click on ‘Add’. When you do so, you will be prompted with a message to place the class in ‘App_Code’ folder. Accept the message to place the class in the 'App_Code' folder.
Step 3: Now let us add functionality to the ErrHandler class. This class will accept the error message and write the message in a text file. One text file will be created for each day. If the text file already exists, the message will be appended to the text file. If not, a new text file will be created based on today’s date and error message will be written in it.
The code will look similar to the following:
C#
/// Handles error by accepting the error message
    /// Displays the page on which the error occured
    public static void WriteError(string errorMessage)
    {
        try
        {
            string path = "~/Error/" + DateTime.Today.ToString("dd-mm-yy") + ".txt";
            if (!File.Exists(System.Web.HttpContext.Current.Server.MapPath(path)))
            {
                File.Create(System.Web.HttpContext.Current.Server.MapPath(path)).Close();
            }
            using (StreamWriter w = File.AppendText(System.Web.HttpContext.Current.Server.MapPath(path)))
            {
                w.WriteLine("\r\nLog Entry : ");
                w.WriteLine("{0}", DateTime.Now.ToString(CultureInfo.InvariantCulture));
                string err = "Error in: " + System.Web.HttpContext.Current.Request.Url.ToString() +
                              ". Error Message:" + errorMessage;
                w.WriteLine(err);
                w.WriteLine("__________________________");
                w.Flush();
                w.Close();
            }
        }
        catch (Exception ex)
        {
            WriteError(ex.Message);
        }
 
    }
VB.NET
''' Handles error by accepting the error message
    ''' Displays the page on which the error occured
    Public Shared Sub WriteError(ByVal errorMessage As String)
        Try
            Dim path As String = "~/Error/" & DateTime.Today.ToString("dd-mm-yy") & ".txt"
            If (Not File.Exists(System.Web.HttpContext.Current.Server.MapPath(path))) Then
                File.Create(System.Web.HttpContext.Current.Server.MapPath(path)).Close()
            End If
            Using w As StreamWriter = File.AppendText(System.Web.HttpContext.Current.Server.MapPath(path))
                w.WriteLine(Constants.vbCrLf & "Log Entry : ")
                w.WriteLine("{0}", DateTime.Now.ToString(CultureInfo.InvariantCulture))
                Dim err As String = "Error in: " & System.Web.HttpContext.Current.Request.Url.ToString() & ". Error Message:" & errorMessage
                w.WriteLine(err)
                w.WriteLine("__________________________")
                w.Flush()
                w.Close()
            End Using
        Catch ex As Exception
            WriteError(ex.Message)
        End Try
 
    End Sub
That was our ErrHandler class. We will now see how to use this Error Handler class and handle errors at the page level as well as at the application level.
Handling errors at Page Level
In the Default.aspx, drag and drop a button from the toolbox. Rename this button to btnError and set the Text as ‘Throw Handled Exception’. Here we will throw an exception. Since we have a catch block defined, the exception will be caught and the error will be logged in the Error folder. Since a text file with today’s date, does not exists, a new text file will be created by the code.
The button click handler will look similar to the following:
C#
protected void btnHandled_Click(object sender, EventArgs e)
    {
        try
        {
            throw new Exception("Sample Exception");
        }
        catch (Exception ex)
        {
            // Log the error to a text file in the Error folder
            ErrHandler.WriteError(ex.Message);
        }
    }
VB.NET
Protected Sub btnHandled_Click(ByVal sender As Object, ByVal e As System.EventArgs) Handles btnHandled.Click
        Try
            Throw New Exception()
        Catch ex As Exception
            ' Log the error to a text file in the Error folder
            ErrHandler.WriteError(ex.Message)
        End Try
    End Sub
Now with the code in place, run the application and click on the button. Since we have handled the error and logged the exception in our code, you will not notice anything when the button is clicked. However, close the application and refresh the Error folder. You will see a new text file created with today’s date. The exception has been logged successfully as shown below. The date and time will differ on your machine.
Log Entry :
01/11/2008 23:33:46
Error in: http://localhost:51087/ErrorHandling/Default.aspx. Error Message:Sample Exception
__________________________
Redirecting users on unhandled errors
Let us see how to catch unhandled errors and redirect the user to a different page, whenever such an unhandled error occurs at the application level.
To catch unhandled errors, do the following. Add a Global.asax file (Right click project > Add New Item > Global.asax). In the Application_Error() method, add the following code:
C#
 void Application_Error(object sender, EventArgs e)
    {
        // Code that runs when an unhandled error occurs
        Exception objErr = Server.GetLastError().GetBaseException();
        string err = "Error in: " + Request.Url.ToString() +
                          ". Error Message:" + objErr.Message.ToString();
        // Log the error
        ErrHandler.WriteError(err);       
    }
VB.NET
Sub Application_Error(ByVal sender As Object, ByVal e As EventArgs)
        ' Code that runs when an unhandled error occurs       
        Dim objErr As Exception = Server.GetLastError().GetBaseException()
        Dim err As String = "Error in: " & Request.Url.ToString() & ". Error Message:" & objErr.Message.ToString()
        ' Log the error
        ErrHandler.WriteError(err)
    End Sub
We capture the error using the Server.GetLastError(). Now to redirect users to a different page whenever an unhandled error occurs, open your web.config file and locate the tag and uncomment it. After removing the comment, the tag will look similar to the following code:
 
                  <customErrorsmode="RemoteOnly"defaultRedirect="GenericErrorPage.htm">
                        <errorstatusCode="403"redirect="NoAccess.htm" />
                        <errorstatusCode="404"redirect="FileNotFound.htm" />
                  customErrors>
Now change:
 mode="RemoteOnly"tomode="On"
defaultRedirect="GenericErrorPage.htm" to defaultRedirect="ErrorPage.aspx"
The modified code will now look like this:
<customErrorsmode="On"defaultRedirect="ErrorPage.aspx">
                        <errorstatusCode="403"redirect="NoAccess.htm" />
                        <errorstatusCode="404"redirect="FileNotFound.htm" />
                  customErrors>
This configuration will now redirect the user to an Error page when an error occurs. Let us create this error page and display some message to the user.
Right Click Project > Add New Item> Create a new ErrorPage.aspx page in the application and display a sample message on the page informing the user that an error has occurred.
To test our functionality, go back to Default.aspx, add another button and rename it to btnUnhandled and set its Text property to ‘Throw Unhandled Exception’. Here instead of throwing the exception as we did for ‘btn_Error’, we will introduce a ‘Divide By Zero’ exception and not handle it. Observe that there is no try catch block as shown below. So when the error occurs, the user will be redirected to the ‘ErrorPage.aspx’ as a result of the changes made in our web.config file.
C#
protected void btnHandled_Click(object sender, EventArgs e)
    {
        try
        {
            throw new Exception("Sample Exception");
        }
        catch (Exception ex)
        {
            // Log the error to a text file in the Error folder
            ErrHandler.WriteError(ex.Message);
        }
    }
VB.NET
Protected Sub btnUnhandled_Click(ByVal sender As Object, ByVal e As System.EventArgs) Handles btnUnhandled.Click
        Dim i As Integer = 1
        Dim j As Integer = 0
        Response.Write(i \ j)
    End Sub
 
Run the application and click on the ‘Throw Unhandled Exception’ button. You will observe that the user will be automatically redirected to the Error Page and the error will be logged in the Error folder. Well that’s it.
In this article, we saw how to implement a simple error logging system in our application. Logging errors can be very useful and helps us detect errors during development and operation of a website. ASP.NET also provides some advanced options titled under ‘Health Monitoring’ where the errors can be stored in Sql Server or even emailed to the administrator based on the criticality of it.
I hope this article was useful and I thank you for viewing it.  Download the source code of the application over here.