Thursday, November 26, 2009

HOW TO: Pass Current Credentials to an ASP.NET Web Service

This step-by-step article describes how to pass the user's current credentials to an XML Web service that was created by using ASP.NET.

The DefaultCredentials property of the CredentialCache class contains the system credentials of the current security context. For client applications, these credentials represent the user name, the password, and the domain of the user who is currently logged on. Client credentials are not passed automatically. To pass the client's Windows security context to a Web service, you must set the Credentials property of the Web service proxy to CredentialCache.DefaultCredentials.


Create the Web Service

  1. Start Microsoft Visual Studio .NET. Create a new ASP.NET Web Service project by using Visual C# .NET or Visual Basic .NET. By default, Service1.asmx is created.
  2. Name the project MyWebService.
  3. In Solution Explorer, right-click Service1.asmx, and then click View Code.
  4. In the Service1.asmx.cs file (or the Service1.asmx.vb file if you used Visual Basic .NET), remove the comment on the default WebMethod HelloWorld().
  5. On the Build menu, click Build Solution.
  6. Type the following URL in your browser to view the Service1 Web service description:
    http://localhost/MyWebService/Service1.asmx
  7. To test the HelloWorld WebMethod, click the HelloWorld link. Notice that the WebMethod works as expected.

Set Integrated Windows Authentication for the Web Service

  1. Click Start, point to Settings, and then click Control Panel.
  2. In Control Panel, double-click Administrative Tools.
  3. Double-click Internet Information Services.
  4. Expand Internet Information Services, and then locate the MyWebService virtual directory.
  5. Right-click MyWebService, and then click Properties.
  6. Click the Directory Security tab. Under Anonymous access and authentication control, click Edit.
  7. In the Authentication Methods dialog box, click to select the check box for Integrated Windows authentication.

Use the Web Service

  1. Create a new ASP.NET Web Application by using Visual C# .NET or Visual Basic .NET. Name the project WebServiceTest.
  2. In Solution Explorer, right-click References, and then click Add Web Reference.
  3. In the Address text box, type the following URL for WebServiceTest:
    http://localhost/MyWebService/Service1.asmx
  4. Click Go, and then click Add Reference.
  5. In Solution Explorer, right-click WebForm1.aspx, and then click View Code.
  6. In the Design View of WebForm1, double-click WebForm1 to open the Page_Load event code. Change the Page_Load event code as follows:

    Visual C# .NET Sample Code
    private void Page_Load(object sender, System.EventArgs e)
    {
    // Start an instance of the Web Service client-side proxy.
    localhost.Service1 myProxy = new localhost.Service1();
    Response.Write( myProxy.HelloWorld()); 
    }
    Visual Basic .NET Sample Code
    Private Sub Page_Load(ByVal sender As System.Object, ByVal e As System.EventArgs) Handles MyBase.Load
    
    'Start an instance of the Web Service client-side proxy.
    Dim myProxy As localhost.Service1 = New localhost.Service1()
    Response.Write(myProxy.HelloWorld())
    End Sub
  7. On the Build menu, click Build Solution.
  8. Type the following URL in the browser to view the Service1 Web service description:
    http://localhost/WebServiceTest/WebForm1.aspx
  9. You may receive an Access Denied error message. This occurs because your credentials are not delivered with the Web service request for authentication.

Pass Current Credentials to the Web Service

The CredentialCache class belongs to the System.Net namespace.
  1. Add the following namespace declaration to the top of the file:

    Visual C# .NET Sample Code
    using System.Net;
    Visual Basic .NET Sample Code
    Imports System.Net
  2. Assign DefaultCredentials to the Credentials property of the Web service client-side proxy. To do this, change the code of the Page_Load event as follows:

    Visual C# .NET Sample:
    private void Page_Load(object sender, System.EventArgs e)
    {
    // Start an instance of the Web service client-side proxy.
    localhost.Service1 myProxy = new localhost.Service1();
    myProxy.Credentials = System.Net.CredentialCache.DefaultCredentials;
    Response.Write( myProxy.HelloWorld()); 
    }
    Visual Basic .NET Sample Code
    Private Sub Page_Load(ByVal sender As System.Object, ByVal e As System.EventArgs) Handles MyBase.Load
    
    'Start an instance of the Web service client-side proxy.
    Dim myProxy As localhost.Service1 = New localhost.Service1()
    myProxy.Credentials = System.Net.CredentialCache.DefaultCredentials
    Response.Write(myProxy.HelloWorld())
    End Sub
    
  3. On the Debug menu, click Start. Hello World appears in the browser.
ASP.NET MVC 2 Beta Default Parameter Values

ASP.NET MVC 2 Beta Default Parameter Values
 
If you’ve been living under a rock in the last few days you may have missed one of the big announcements at PDC 09. Microsoft has released ASP.NET MVC 2 Beta! This is very exciting! To get your hands on this beta release you can go here to download it.
Some of the cooler features in this release are the following:

- Strongly typed UI helpers
- Areas support
- DataAnnotation validation support
- UI helper templating support

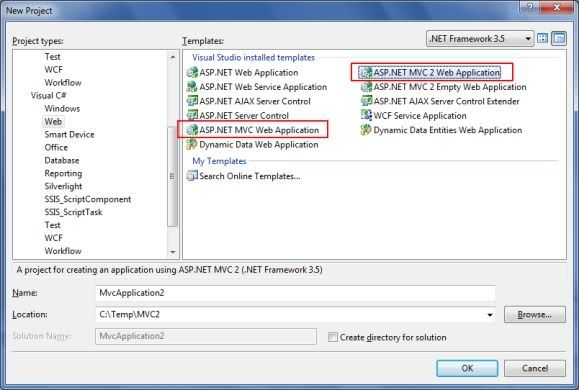
ASP.NET MVC 2 Beta works side by side with ASP.NET MVC 1. This article was creating using Visual Studio 2008 Service Pack 1. Once you’ve installed the beta you’ll have the option for both projects.
 
NewProject
 
I’ll focus more on the different areas in upcoming articles. This article will look at the new DefaultValue attribute. This is a way for specifying default values for parameters. In ASP.NET MVC 1 you either had to write a custom route to pass in default values, or create nullable types as parameters and check for the null values in your code. ASP.NET MVC 2 Beta now supports decorating action method parameters with the DefaultValueAttribute from the System.ComponentModel namespace. This allows you to specify parameters values if none are present. 
The above scenario is much simpler with an example. Suppose you build a website which displays a list of cars. You’ll need to create a cars controller. Each car has a make and model, but the user might not know the make and model, so this is when you would create a default route in the global.asax file to handle this:
routes.MapRoute(
                "CarsDefault",
                "Cars/{action}/{make}/{model}",
                new { controller = "Cars", action = "Model", make = "Holden", model = "Camaro" }
                );
 
routes.MapRoute(
                "Default",                                            
                "{controller}/{action}/{id}",                         
                new { controller = "Home", action = "Index", id = "" }
            );
The first MapRoute will default the make value to Holden and the model value to Camaro if no parameters are passed to the action method. There’s nothing wrong with doing it this way. The downside of this is your global.asax file can fill up quickly if you have numerous routes. In ASP.NET MVC 2 Beta this is taken care of for you thanks to DefaultValue attribute. Now you can leave the global.asax file and move the logic into your action method:
C#
using System.ComponentModel;
public ActionResult Make([DefaultValue("Holden")] string make,
                         [DefaultValue("Camaro")] string model)
{
return View();
}
The DefaultValue attribute is prefixed to the parameter, so in the example above, if I don’t specify a make, the default value will be Holden. This frees up the global.asax file and makes your code more discoverable in my opinion. Default values can be positioned anywhere in your arguments, so your action could look like this:
C#
using System.ComponentModel;
public ActionResult Make([DefaultValue("Holden")] string make,
                         string model)
{
return View();
}
 
This is one of the new features in ASP.NET MVC 2 Beta. In the next few weeks I’ll be posting more articles on the other new features. Stay tuned! The entire source code of this article can be downloaded over here

Monday, November 16, 2009

Partitioning Data Using LINQ

 
We often come across requirements where data needs to be partitioned into two parts and then return one of the parts. The Partition Operators in LINQ helps you partition data. These operators are Skip, SkipWhile, Take and TakeWhile. In this article, we will see how to use these operators to partition collections. Malcolm Sheridan had posted a cool article demonstrating a practical usage of the Skip and Take operators. You can read it over here Efficient Server Side Paging with the ASP.NET  GridView Control. You can also read more about Partition Operators over here

For demonstration purposes, we will take the Person class as a sample whose definition is as shown below:
C#
class Program
{
    static void Main(string[] args)
    {
        List<Person> collectionOne = new List<Person>();
        collectionOne.Add(new Person() { ID = 1, Name = "Jack" });
        collectionOne.Add(new Person() { ID = 2, Name = "Julian" });
        collectionOne.Add(new Person() { ID = 3, Name = "David" });
        collectionOne.Add(new Person() { ID = 4, Name = "Kathy" });
        collectionOne.Add(new Person() { ID = 5, Name = "Jennifer" });
        collectionOne.Add(new Person() { ID = 6, Name = "Billy" });
    }
 
    static void PrintConsole(List<Person> per)
    {
        foreach (Person p in per)
        {
            Console.WriteLine("{0} {1}", p.ID, p.Name);               
        }
        Console.ReadLine();
    }
}
 
 
class Person
{
    public int ID { get; set; }
    public string Name { get; set; }   
}
VB.NET

Module Module1
 
    Sub Main()
        Dim collectionOne As New List(Of Person)()
        collectionOne.Add(New Person() With {.ID = 1, .Name = "Jack"})
        collectionOne.Add(New Person() With {.ID = 2, .Name = "Julian"})
        collectionOne.Add(New Person() With {.ID = 3, .Name = "David"})
        collectionOne.Add(New Person() With {.ID = 4, .Name = "Kathy"})
        collectionOne.Add(New Person() With {.ID = 5, .Name = "Jennifer"})
        collectionOne.Add(New Person() With {.ID = 6, .Name = "Billy"})      
    End Sub
 
    Sub PrintConsole(ByVal per As List(Of Person))
        For Each p As Person In per
            Console.WriteLine("{0} {1}", p.ID, p.Name)
        Next p
        Console.ReadLine()
    End Sub
 
End Module
 
Class Person
    Private privateID As Integer
    Public Property ID() As Integer
        Get
            Return privateID
        End Get
        Set(ByVal value As Integer)
            privateID = value
        End Set
    End Property
    Private privateName As String
    Public Property Name() As String
        Get
            Return privateName
        End Get
        Set(ByVal value As String)
            privateName = value
        End Set
    End Property
End Class
The PrintConsole() method accepts a List<> and prints it on the console.
Let us now explore the Partition Operators.
Skip – The ‘Skip’ Operator skips elements to a specified position in a sequence and returns the remaining elements. Let us see how to use the Skip operator
In this example, we will be skipping the first two elements in the List and return the remaining elements
C#
var p1 = collectionOne.Skip(2).ToList();
PrintConsole(p1);

VB.NET
Dim p1 = collectionOne.Skip(2).ToList()
PrintConsole(p1)
 
Output
Skip Operator
SkipWhile – The ‘SkipsWhile’ operator skips elements in a sequence as long as the specified condition remains true and then returns the remaining elements.
In this example, we will be skipping the elements in the List till the name “Kathy” and return the remaining elements along with “Kathy”
C#
var p2 = collectionOne.SkipWhile(x => x.Name != "Kathy").ToList();
PrintConsole(p2);
VB.NET
Dim p2 = collectionOne.SkipWhile(Function(x) x.Name <> "Kathy").ToList()
PrintConsole(p2)
 
Output
SkipWhile
Take – The ‘Take’ operator grabs elements to a specified position in the sequence and returns the grabbed elements
In this example, we will grab the first two elements in the List
C#
var p3 = collectionOne.Take(2).ToList();
PrintConsole(p3);
VB.NET
Dim p3 = collectionOne.Take(2).ToList()
PrintConsole(p3)
 
Output
Take Operator
TakeWhile - The ‘TakeWhile’ operator grabs elements to a specified position in the sequence till the specified condition is true and returns the grabbed elements
In this example, we will grab the elements till ID<=4 in the List
C#
var p4 = collectionOne.TakeWhile(x => x.ID <= 4).ToList();
PrintConsole(p4);
VB.NET
Dim p4 = collectionOne.TakeWhile(Function(x) x.ID <= 4).ToList()
PrintConsole(p4)
 
Output
TakeWhile
In this article, we saw how to use LINQ operators to partition data.

Wednesday, November 4, 2009

Use Keyboard Shortcuts to Create Tooltips for Forms using jQuery


I’ve said this once and I’ll say it again, jQuery is cool. Something on the web that is very helpful to users when filling out HTML forms is for you, the developer, to give them help along the way. I thought it would be cool to use jQuery to show help tooltips when the user clicks on a combination of keys using their keyboard. This article will demonstrate how to capture keyboard events in JavaScript and display help tooltips. 
Before we get started, this example uses the latest version of jQuery which is 1.3.2. That can be downloaded from here. The jQuery Tools and can be downloaded from here
Open Visual Studio 2008 and choose File > New > Web > ASP.NET Web Application. Add the following HTML to the Default.aspx page:
 
<table>
            <tr>
                <td>
                    Given Name
                td>
                <td>
                    <input type="text" maxlength="10" id="txtGivenName" />
                td>
                <td>
                    <div id="givenName" style="display:none;" title="G">
                       <img src="info.png" alt="Info" width="16" height="16" />
                        Please supply your given namediv>           
                td>
            tr>
            <tr>
                <td>
                    Surname
                td>
                <td>
                    <input type="text" maxlength="20" id="txtSurname" />
                td>
                <td>
                    <div id="surname" style="display:none;" title="S">
                        <img src="info.png" alt="Info" width="16" height="16" />
                        Please supply your surname. This can only be <b>20b> characters longdiv>       
                td>
            tr>
        table>  
 
The HTML above is quite simple. There’s a table which contains two text boxes. In the cell to the right of the text boxes there’s a
element which contains an image and some useful text if the user gets lost or in unsure of what value to put in the text box. To make a generic piece of JavaScript I’m going to use the title attribute in the
element. I’ll use that as the key to combine with the shift key. The next step is to add the following jQuery code to the section of the page. Ideally JavaScript should go to a separate .js file, however for this example; I’ll keep it in the same page:
 
<script language="javascript" type="text/javascript" src="http://ajax.googleapis.com/ajax/libs/jquery/1.3.2/jquery.min.js">script>
    <script type="text/javascript" language="javascript">
        $(document).ready(function() {
            $(this).keydown(function(e) {
                var evt = e || window.event;
                if (evt.shiftKey) {                   
                    findHelp(evt).fadeIn("slow");
                }
            });
 
            $(this).keyup(function(e) {
                var evt = e || window.event;
                if (evt.shiftKey) {                   
                    findHelp(evt).hide("fast");
                }
            });
        });       
 
        function findHelp(e) {
            var key = (e.keyCode ? e.keyCode : e.charCode);
            return $("div[title=" + String.fromCharCode(key) + "]");
        } 
    script> 
 
In the above code, I’m binding to the document’s keydown and keyup events. On the keydown event, I want to show the tooltip, and on keyup, hide it. 
$(this).keydown(function(e)
$(this).keyup(function(e)
Both pieces of code get information about the event through the argument e. Because I only want this to work when the user holds down the shift key, I’m checking for that through the evt.shiftKey variable. This indicates whether the shift key was pressed when the event fired
var evt = e || window.event;
if (evt.shiftKey)
 
From there I have created a function called findHelp. The sender of the event is passed to this function. I grab either the keyCode or charCode value, and then use that in the jQuery Selector to find the related
element by its title attribute:
 
function findHelp(e) {
var key = (e.keyCode ? e.keyCode : e.charCode);
      return $("div[title=" + String.fromCharCode(key) + "]");
}
 
Running this code now will display the simple form. If you hold down Shift + S or Shift + G it will show and hide the tooltip for each text box.
Before the keydown event and on the keyup event
KeyDownevent_1
During the keydown event
KeyDownevent_2
This is a nice addition for any website that wants to help their users fill out HTML forms. For more information on keyboard events you can go here for more reading. The entire source code of this article can be downloaded over here

Monday, November 2, 2009

Implementing KeyBoard Shortcuts on an ASP.NET Hyperlink Control using jQuery

Implementing KeyBoard Shortcuts on an ASP.NET Hyperlink Control using jQuery
 
Popular Web apps like Gmail and Windows Live Mail feature Keyboard shortcuts, which help you save time by executing common operations using the Keyboard, without having to switch between the keyboard and mouse. In this short article, I will demonstrate how to use jQuery to implement keyboard shortcuts on an ASP.NET Hyperlink control. This article is a sample chapter from my EBook called 51 Tips, Tricks and Recipes with jQuery and ASP.NET Controls
Note that for demonstration purposes, I have included jQuery code in the same page. Ideally, these resources should be created in separate folders for maintainability.
Let us quickly jump to the solution and see how we can implement KeyBoard shortcut on the Hyperlink control
<html xmlns="http://www.w3.org/1999/xhtml">
<head runat="server">
    <title>Implement KeyBoard Shortcuts on Hyperlinkstitle>
    <script type='text/javascript'
        src='../Scripts/jquery-1.3.2.min.js'>
    script>
   
    <script type="text/javascript">
        $(function() {
            $(document).keyup(function(e) {
                var key = (e.keyCode ? e.keyCode : e.charCode);
                switch (key) {
                    case 49:
                        navigateUrl($('a[id$=linkA]'));
                        break;
                    case 50:
                        navigateUrl($('a[id$=linkB]'));
                        break;
                    case 51:
                        navigateUrl($('a[id$=linkC]'));
                        break;
                    default: ;
                }
            });
            function navigateUrl(jObj) {
                window.location.href = $(jObj).attr("href");
                alert("Navigating to " + $(jObj).attr("href"));
            }
        });       
    script>
 
head>
<body>
    <form id="form1" runat="server">
    <div class="tableDiv">
        <h2>Use Keyboard Keys 1, 2 or 3 to invoke respective
            websitesh2><br />
        <asp:HyperLink ID="linkA" runat="server"
            NavigateUrl="http://www.dotnetcurry.com">
            DotNetCurryasp:HyperLink><br /><br />
        <asp:HyperLink ID="linkB" runat="server"
            NavigateUrl="http://www.sqlservercurry.com">
            SqlServerCurryasp:HyperLink><br /><br />
        <asp:HyperLink ID="linkC" runat="server"
            NavigateUrl="http://www.devcurry.com">
            DevCurryasp:HyperLink><br /><br />
    div>
   
    form>
body>
html>
Implementing a Keyboard shortcut in jQuery is relatively simple as shown here. The code first captures the keyup event and the key is detected using the keyCode or charCode.
$(document).keyup(function(e) {
    var key = (e.keyCode ? e.keyCode : e.charCode);
In the code shown below, if the key = 49, digit 1 is pressed by the user and the first Hyperlink is auto-clicked. Similarly if the key = 50 or 51, then digit 2 or 3 are pressed respectively and the 2nd or 3rd hyperlink is autoclicked. Once the key matches any of the switch case statement, the function navigateUrl() is called passing in the respective hyperlink control object to the function. So if the user pressed 1, the first hyperlink control object is passed to the function as shown below:
switch (key) {
    case 49:
        navigateUrl($('a[id$=linkA]'));
        break;
The navigateUrl function looks like this:
function navigateUrl(jObj) {
    window.location.href = $(jObj).attr("href");
}
The function accepts the hyperlink object and sets the ‘window.location.href’ to the href attribute of the Hyperlink passed in. This is how we invoke actions with shortcut keys.
Tip: keyCode represents the actual key pressed as a numerical value, whereas charCode gives the ASCII/Unicode value of the key press result (for eg: Shift + A). Firefox and other browsers also support ‘e.which’. IE and Opera does not support charCode.
Keyboard shortcuts improve productivity by accomplishing tasks more quickly and without much effort. In applications, where the user has to select from a variety of actions to perform, keyboard shortcuts can save on time and effort.
You can see a Live Demo over here. The entire source code of this article can be downloaded over here