Most of the web applications have a lot of images used in it. These images are usually stored in a web server folder and they are accessed by giving the relative path to the file with respect to the root folder of the website.
.Net being the platform for distributed application now, ASP.Net can be used to store images that are small to be stored in a database like SQL Server 2000 and later versions. For this purpose the SQL Server database provides a data type called “image” which is used to store images in the database.
To access these images stored in the database we will be using the ADO.Net classes. To find out how to insert and retrieve an image in to the SQL Server database, you can create a .aspx page which can have a HTMLInputFile control which is used to select the image file that is to be saved in the database.
You can also create a textbox control in which you can add the image name or some comment or an image id for the image saved. Use a button control to upload the image to the database. Namespaces like System.Data.SqlClient, System.Drawing, System.Data, System.IO, and System.Drawing.Imaging are used in this task.
In the OnClick property of the button you can write the following code to upload an image to the database.
// create a byte[] for the image file that is uploaded
int imagelen = Upload.PostedFile.ContentLength;
byte[] picbyte = new byte[imagelen];
Upload.PostedFile.InputStream.Read (picbyte, 0, imagelen);
// Insert the image and image id into the database
SqlConnection conn = new SqlConnection (@"give the connection string here...");
try
{
conn.Open ();
SqlCommand cmd = new SqlCommand ("insert into ImageTable "
+ "(ImageField, ImageID) values (@pic, @imageid)", conn);
cmd.Parameters.Add ("@pic", picbyte);
cmd.Parameters.Add ("@imageid", lblImageID.Text);
cmd.ExecuteNonQuery ();
}
finally
{
conn.Close ();
}
You can also write the above code in a function and call that function in the OnClick event of the upload button. The code given above performs the following steps in the process of inserting an image into the database.
1. Get the content length of the image that is to be uploaded
2. Create a byte[] to store the image
3. Read the input stream of the posted file
4. Create a connection object
5. Open the connection object
6. Create a command object
7. Add parameters to the command object
8. Execute the sql command using the ExecuteNonQuery method of the command object
9. Close the connection object
To retrieve the image from the SQL Database you can perform the following steps.
1. Create a MemoryStream object. The code can be something like,
MemoryStream mstream = new MemoryStream ();
2. Create a Connection object
3. Open the connection to the database
4. Create a command object to execute the command to retrieve the image
5. Use the command object’s ExecuteScalar method to retrieve the image
6. Cast the output of the ExecuteScalar method to that of byte[]
byte[] image = (byte[]) command.ExecuteScalar ();
7. Write the stream
mstream.Write (image, 0, image.Length);
8. Create a bitmap object to hold the stream
Bitmap bitmap = new Bitmap (stream);
9. Set the content type to “image/gif”
Response.ContentType = "image/gif";
10. Use the Save method of the bitmap object to output the image to the OutputStream.
bitmap.Save (Response.OutputStream, ImageFormat.Gif);
11. Close the connection
12. Close the stream
mstream.Close();
Using the above steps you can retrieve and display the image from the database to the web page.
You can use these algorithms and take advantage of the “image” data type available in the SQLServer 2000 database to store small images that correspond to a particular record in the table of the database. This method of storing avoids the tedious task of tracking the path of the web folder if the images are stored in a web folder.
Thursday, December 24, 2009
Wednesday, December 9, 2009
Creating Email Triggers in SQL Server 2005
Creating Email Triggers in SQL Server 2005
What exactly is a trigger?
It is a piece of SQL that is activated when a certain event happens or occurs. A common usage is when a new record is added to a database, this triggers an action - for example, a new member triggers an email to the admin for the registration. Or you have certain records in a database table that are assigned to a particular customer and, upon that record being updated, that customer/admin should be notified of the change.
Triggers are useful to fire events and perform some action when data is inserted, updated, or deleted from a table. Microsoft SQL Server's xp_sendmail stored procedure can be invoked to send an email to one or more recipients.
Creating the Table
We will start by creating a table which will hold Customer Information that need to be updated. The name of the table is CustomerInfo

or you can use the following Sql Script
| CREATE TABLE [CustomerInfo] ( [CUSTOMER_ID] [int] IDENTITY(1,1) NOT NULL, [FIRST_NAME] [varchar](50) NULL, [MIDDLE_NAME] [varchar](50) NULL, [LAST_NAME] [nvarchar](50) NULL, ) GO |
Inserting the Data
Now, we will insert some dummy data into the table. You can directly insert the data into the table by using the Grid Format or you can just write the script to do that.

or you can use the following Sql Script
| INSERT INTO [CustomerInfo]([CUSTOMER_ID],[FIRST_NAME],[MIDDLE_NAME],[LAST_NAME]) VALUES (1,'Amjad','Ali','Leghari') INSERT INTO [CustomerInfo]([CUSTOMER_ID],[FIRST_NAME],[MIDDLE_NAME],[LAST_NAME]) VALUES (2,'Ali','Raza','Shaikh') |
Creating the Trigger
Now coming down to the business, we will create the trigger for the CustomerInfo table, but there are few steps that need to be checked before creating the trigger.
- Check that the trigger already exists
- If the trigger already exists, then delete it
If the trigger doesn’t exists, now you can create the specified trigger. Right click on the Trigger section and click on “New Trigger”.

This will generate the following template.
| -- ================================================ -- Template generated from Template Explorer using: -- Create Trigger (New Menu).SQL -- -- Use the Specify Values for Template Parameters -- command (Ctrl-Shift-M) to fill in the parameter -- values below. -- -- See additional Create Trigger templates for more -- examples of different Trigger statements. -- -- This block of comments will not be included in -- the definition of the function. -- ================================================ SET ANSI_NULLS ON GO SET QUOTED_IDENTIFIER ON GO -- ============================================= -- Author: -- Create date: -- Description: -- ============================================= CREATE TRIGGER <Schema_Name, sysname, Schema_Name>.<Trigger_Name, sysname, Trigger_Name> ON <Schema_Name, sysname, Schema_Name>.<Table_Name, sysname, Table_Name> AFTER <Data_Modification_Statements, , INSERT,DELETE,UPDATE> AS BEGIN -- SET NOCOUNT ON added to prevent extra result sets from -- interfering with SELECT statements. SET NOCOUNT ON; -- Insert statements for trigger here END GO |
So, now we end up writing the following trigger
| -- Create Trigger with name 'CustomerUpdateMail' CREATE TRIGGER CustomerUpdateMail -- and the table is CustomerInfo ON CustomerInfo -- trigger is fired when an update is made for the table FOR UPDATE AS -- holds the CustomerID so we know which Customer was updated declare @CustomerID varchar(10) -- holds the body of the email declare @body varchar(2000) -- holds the old customer name which has been changed declare @CustomerName varchar(10) -- holds the new customer name declare @CustomerNewName varchar(10) -- gets the previous customer first name that was deleted SELECT @CustomerID = Customer_id, @CustomerName = d.First_Name FROM deleted d -- gets the new customer first name SELECT @CustomerNewName = First_Name FROM inserted SET @body = 'Customer with ID=' @CustomerID ' has been updated with previous First Name is ' @CustomerName ' and the new First Name is ' @CustomerNewName --xp_sendmail is the extended sproc used to send the mail EXEC master..xp_sendmail @recipients = 'ali_raza_shaikh@datasprings.com', @subject = 'Customer Information Updated', @message = @body GO |
So, after writing the trigger, execute it to create the trigger and you can see the newly created trigger under the trigger section.

xp_sendmail extended stored procedure
Sends an e-mail message, which may include a query result set attachment, to the specified recipients. This extended stored procedure uses SQL Mail to send the message. In order to use this extended stored procedure you must have SQL Mail Setup. You must grant EXECUTE permissions for the xp_sendmail procedure in the master database. After completing all these steps, the following lines will send the mail to the target recipient.
| --xp_sendmail is the extended sproc used to send the mail EXEC master..xp_sendmail @recipients = 'deepakkarma@gmail.com', @subject = 'Customer Information Updated', @message = @body |
Testing the Trigger
After the table has been created, we inserted the dummy data into the tables and in the end created a trigger to mail the user about the customer update, now its time to execute the trigger. You can execute the trigger by using the following lines.
update customerinfo
set First_Name='Deepak Update'
where customer_id=1
Sunday, December 6, 2009
Create an ASP.NET TextBox Watermark Effect using jQuery
Create an ASP.NET TextBox Watermark Effect using jQuery
This short article demonstrates how to create a watermark effect on your TextBox and display instructions to users, without taking up screen space. This article is a sample chapter from my EBook called 51 Tips, Tricks and Recipes with jQuery and ASP.NET Controls. The chapter has been modified a little to publish it as an article.
Note that for demonstration purposes, I have included jQuery code in the same page. Ideally, these resources should be created in separate folders for maintainability.
Let us quickly jump to the solution and see how we can create a watermark effect on your TextBox using client-side code.
DOCTYPE html PUBLIC "-//W3C//DTD XHTML 1.0 Transitional//EN"
"http://www.w3.org/TR/xhtml1/DTD/xhtml1-transitional.dtd">
<html xmlns="http://www.w3.org/1999/xhtml">
<head id="Head1" runat="server">
<title>TextBox WaterMarktitle>
<script type="text/javascript"
src="http://ajax.googleapis.com/ajax/libs/jquery/1.3.2/jquery.min.js">
script>
<style type="text/css">
.water
{
font-family: Tahoma, Arial, sans-serif;
color:gray;
}
style>
<script type="text/javascript">
$(function() {
$(".water").each(function() {
$tb = $(this);
if ($tb.val() != this.title) {
$tb.removeClass("water");
}
});
$(".water").focus(function() {
$tb = $(this);
if ($tb.val() == this.title) {
$tb.val("");
$tb.removeClass("water");
}
});
$(".water").blur(function() {
$tb = $(this);
if ($.trim($tb.val()) == "") {
$tb.val(this.title);
$tb.addClass("water");
}
});
});
script>
head>
<body>
<form id="form1" runat="server">
<div class="smallDiv">
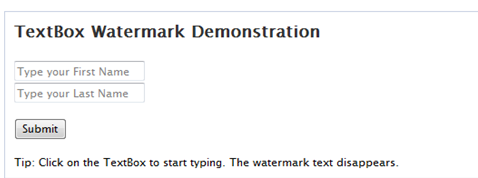
<h2>TextBox Watermark Demonstrationh2> <br />
<asp:TextBox ID="txtFNm" class="water" Text="Type your First Name"
Tooltip="Type your First Name" runat="server">asp:TextBox><br />
<asp:TextBox ID="txtLNm" class="water" Text="Type your Last Name"
Tooltip="Type your Last Name" runat="server">asp:TextBox>
<br /><br />
<asp:Button ID="btnSubmit" runat="server" Text="Submit" />
<br /><br />
Tip: Click on the TextBox to start typing. The watermark
text disappears.
div>
form>
body>
html>
The code shown above adds the “watermark” behavior to controls marked with the ‘class=water’ attribute. When the user loads the page, a watermarked textbox displays a message to the user. As soon as the watermarked textbox receives focus and the user types some text, the watermark goes away. This technique is a great space saver as you can use it to provide instructions to the user, without using extra controls that take up valuable space on your form.
The ‘Tooltip’ attribute applied to the textbox is crucial to this example. The ‘Tooltip’ gets rendered as ‘title’. Observe the code, as we use this ‘title’ property to compare it to the textbox value and remove the watermark css, when the textbox control gains focus
$(".water").focus(function() {
$tb = $(this);
if ($tb.val() == this.title) {
$tb.val("");
$tb.removeClass("water");
}
});
Similarly when the user moves focus to a different control without entering a value in the textbox, we add the watermark css again.
$(".water").blur(function() {
$tb = $(this);
if ($.trim($tb.val()) == "") {
$tb.val(this.title);
$tb.addClass("water");
}
});
The water class declared in Demos.css looks like this:
.water
{
font-family: Tahoma, Arial, sans-serif;
font-size:75%;
color:gray;
}
When the page loads for the first time, the watermark is visible as shown here:
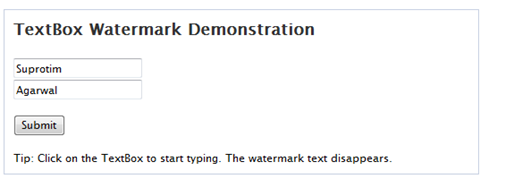
When the user enters the First/Last Name and submits the form, the watermark behavior is no more needed to be displayed. This is achieved by comparing the ‘title’ with the ‘value’ of the textbox. If the ‘value’ does not match the ‘title’, this indicates that the user has entered some value in the textboxes and submitted the form. So in this case we remove the watermark appearance.
$(".water").each(function() {
$tb = $(this);
if ($tb.val() != this.title) {
$tb.removeClass("water");
}
});
After the user enters the details and submits the form, the result is similar to the one shown here, without the watermark:
Thanks to Arnold Matusz for sharing the tip about the tooltip property. The code has been tested on IE 7, IE 8, Firefox 3, Chrome 2, Safari 4 browsers
You can see a Live Demo over here
Thursday, November 26, 2009
HOW TO: Pass Current Credentials to an ASP.NET Web Service
This step-by-step article describes how to pass the user's current credentials to an XML Web service that was created by using ASP.NET.
The DefaultCredentials property of the CredentialCache class contains the system credentials of the current security context. For client applications, these credentials represent the user name, the password, and the domain of the user who is currently logged on. Client credentials are not passed automatically. To pass the client's Windows security context to a Web service, you must set the Credentials property of the Web service proxy to CredentialCache.DefaultCredentials.
The DefaultCredentials property of the CredentialCache class contains the system credentials of the current security context. For client applications, these credentials represent the user name, the password, and the domain of the user who is currently logged on. Client credentials are not passed automatically. To pass the client's Windows security context to a Web service, you must set the Credentials property of the Web service proxy to CredentialCache.DefaultCredentials.
Create the Web Service
- Start Microsoft Visual Studio .NET. Create a new ASP.NET Web Service project by using Visual C# .NET or Visual Basic .NET. By default, Service1.asmx is created.
- Name the project MyWebService.
- In Solution Explorer, right-click Service1.asmx, and then click View Code.
- In the Service1.asmx.cs file (or the Service1.asmx.vb file if you used Visual Basic .NET), remove the comment on the default WebMethod HelloWorld().
- On the Build menu, click Build Solution.
- Type the following URL in your browser to view the Service1 Web service description:http://localhost/MyWebService/Service1.asmx
- To test the HelloWorld WebMethod, click the HelloWorld link. Notice that the WebMethod works as expected.
Set Integrated Windows Authentication for the Web Service
- Click Start, point to Settings, and then click Control Panel.
- In Control Panel, double-click Administrative Tools.
- Double-click Internet Information Services.
- Expand Internet Information Services, and then locate the MyWebService virtual directory.
- Right-click MyWebService, and then click Properties.
- Click the Directory Security tab. Under Anonymous access and authentication control, click Edit.
- In the Authentication Methods dialog box, click to select the check box for Integrated Windows authentication.
Use the Web Service
- Create a new ASP.NET Web Application by using Visual C# .NET or Visual Basic .NET. Name the project WebServiceTest.
- In Solution Explorer, right-click References, and then click Add Web Reference.
- In the Address text box, type the following URL for WebServiceTest:http://localhost/MyWebService/Service1.asmx
- Click Go, and then click Add Reference.
- In Solution Explorer, right-click WebForm1.aspx, and then click View Code.
- In the Design View of WebForm1, double-click WebForm1 to open the Page_Load event code. Change the Page_Load event code as follows:
Visual C# .NET Sample CodeVisual Basic .NET Sample Codeprivate void Page_Load(object sender, System.EventArgs e) { // Start an instance of the Web Service client-side proxy. localhost.Service1 myProxy = new localhost.Service1(); Response.Write( myProxy.HelloWorld()); }Private Sub Page_Load(ByVal sender As System.Object, ByVal e As System.EventArgs) Handles MyBase.Load 'Start an instance of the Web Service client-side proxy. Dim myProxy As localhost.Service1 = New localhost.Service1() Response.Write(myProxy.HelloWorld()) End Sub
- On the Build menu, click Build Solution.
- Type the following URL in the browser to view the Service1 Web service description:http://localhost/WebServiceTest/WebForm1.aspx
- You may receive an Access Denied error message. This occurs because your credentials are not delivered with the Web service request for authentication.
Pass Current Credentials to the Web Service
The CredentialCache class belongs to the System.Net namespace.- Add the following namespace declaration to the top of the file:
Visual C# .NET Sample CodeVisual Basic .NET Sample Codeusing System.Net;
Imports System.Net
- Assign DefaultCredentials to the Credentials property of the Web service client-side proxy. To do this, change the code of the Page_Load event as follows:
Visual C# .NET Sample:Visual Basic .NET Sample Codeprivate void Page_Load(object sender, System.EventArgs e) { // Start an instance of the Web service client-side proxy. localhost.Service1 myProxy = new localhost.Service1(); myProxy.Credentials = System.Net.CredentialCache.DefaultCredentials; Response.Write( myProxy.HelloWorld()); }Private Sub Page_Load(ByVal sender As System.Object, ByVal e As System.EventArgs) Handles MyBase.Load 'Start an instance of the Web service client-side proxy. Dim myProxy As localhost.Service1 = New localhost.Service1() myProxy.Credentials = System.Net.CredentialCache.DefaultCredentials Response.Write(myProxy.HelloWorld()) End Sub
- On the Debug menu, click Start. Hello World appears in the browser.
ASP.NET MVC 2 Beta Default Parameter Values
ASP.NET MVC 2 Beta Default Parameter Values
If you’ve been living under a rock in the last few days you may have missed one of the big announcements at PDC 09. Microsoft has released ASP.NET MVC 2 Beta! This is very exciting! To get your hands on this beta release you can go here to download it.
Some of the cooler features in this release are the following:
- Strongly typed UI helpers
- Areas support
- DataAnnotation validation support
- UI helper templating support
- Strongly typed UI helpers
- Areas support
- DataAnnotation validation support
- UI helper templating support
ASP.NET MVC 2 Beta works side by side with ASP.NET MVC 1. This article was creating using Visual Studio 2008 Service Pack 1. Once you’ve installed the beta you’ll have the option for both projects.
I’ll focus more on the different areas in upcoming articles. This article will look at the new DefaultValue attribute. This is a way for specifying default values for parameters. In ASP.NET MVC 1 you either had to write a custom route to pass in default values, or create nullable types as parameters and check for the null values in your code. ASP.NET MVC 2 Beta now supports decorating action method parameters with the DefaultValueAttribute from the System.ComponentModel namespace. This allows you to specify parameters values if none are present.
The above scenario is much simpler with an example. Suppose you build a website which displays a list of cars. You’ll need to create a cars controller. Each car has a make and model, but the user might not know the make and model, so this is when you would create a default route in the global.asax file to handle this:
routes.MapRoute(
"CarsDefault",
"Cars/{action}/{make}/{model}",
new { controller = "Cars", action = "Model", make = "Holden", model = "Camaro" }
);
routes.MapRoute(
"Default",
"{controller}/{action}/{id}",
new { controller = "Home", action = "Index", id = "" }
);
The first MapRoute will default the make value to Holden and the model value to Camaro if no parameters are passed to the action method. There’s nothing wrong with doing it this way. The downside of this is your global.asax file can fill up quickly if you have numerous routes. In ASP.NET MVC 2 Beta this is taken care of for you thanks to DefaultValue attribute. Now you can leave the global.asax file and move the logic into your action method:
C#
using System.ComponentModel;
public ActionResult Make([DefaultValue("Holden")] string make,
[DefaultValue("Camaro")] string model)
{
return View();
}
The DefaultValue attribute is prefixed to the parameter, so in the example above, if I don’t specify a make, the default value will be Holden. This frees up the global.asax file and makes your code more discoverable in my opinion. Default values can be positioned anywhere in your arguments, so your action could look like this:
C#
using System.ComponentModel;
public ActionResult Make([DefaultValue("Holden")] string make,
string model)
{
return View();
}
This is one of the new features in ASP.NET MVC 2 Beta. In the next few weeks I’ll be posting more articles on the other new features. Stay tuned! The entire source code of this article can be downloaded over here
Monday, November 16, 2009
Partitioning Data Using LINQ
We often come across requirements where data needs to be partitioned into two parts and then return one of the parts. The Partition Operators in LINQ helps you partition data. These operators are Skip, SkipWhile, Take and TakeWhile. In this article, we will see how to use these operators to partition collections. Malcolm Sheridan had posted a cool article demonstrating a practical usage of the Skip and Take operators. You can read it over here Efficient Server Side Paging with the ASP.NET GridView Control. You can also read more about Partition Operators over here
For demonstration purposes, we will take the Person class as a sample whose definition is as shown below:
C#
class Program
{
static void Main(string[] args)
{
List<Person> collectionOne = new List<Person>();
collectionOne.Add(new Person() { ID = 1, Name = "Jack" });
collectionOne.Add(new Person() { ID = 2, Name = "Julian" });
collectionOne.Add(new Person() { ID = 3, Name = "David" });
collectionOne.Add(new Person() { ID = 4, Name = "Kathy" });
collectionOne.Add(new Person() { ID = 5, Name = "Jennifer" });
collectionOne.Add(new Person() { ID = 6, Name = "Billy" });
}
static void PrintConsole(List<Person> per)
{
foreach (Person p in per)
{
Console.WriteLine("{0} {1}", p.ID, p.Name);
}
Console.ReadLine();
}
}
class Person
{
public int ID { get; set; }
public string Name { get; set; }
}
VB.NET
Module Module1
Sub Main()
Dim collectionOne As New List(Of Person)()
collectionOne.Add(New Person() With {.ID = 1, .Name = "Jack"})
collectionOne.Add(New Person() With {.ID = 2, .Name = "Julian"})
collectionOne.Add(New Person() With {.ID = 3, .Name = "David"})
collectionOne.Add(New Person() With {.ID = 4, .Name = "Kathy"})
collectionOne.Add(New Person() With {.ID = 5, .Name = "Jennifer"})
collectionOne.Add(New Person() With {.ID = 6, .Name = "Billy"})
End Sub
Sub PrintConsole(ByVal per As List(Of Person))
For Each p As Person In per
Console.WriteLine("{0} {1}", p.ID, p.Name)
Next p
Console.ReadLine()
End Sub
End Module
Class Person
Private privateID As Integer
Public Property ID() As Integer
Get
Return privateID
End Get
Set(ByVal value As Integer)
privateID = value
End Set
End Property
Private privateName As String
Public Property Name() As String
Get
Return privateName
End Get
Set(ByVal value As String)
privateName = value
End Set
End Property
End Class
The PrintConsole() method accepts a List<> and prints it on the console.
Let us now explore the Partition Operators.
Skip – The ‘Skip’ Operator skips elements to a specified position in a sequence and returns the remaining elements. Let us see how to use the Skip operator
In this example, we will be skipping the first two elements in the List and return the remaining elements
C#
var p1 = collectionOne.Skip(2).ToList();
PrintConsole(p1);
VB.NET
Dim p1 = collectionOne.Skip(2).ToList()
PrintConsole(p1)
Output

SkipWhile – The ‘SkipsWhile’ operator skips elements in a sequence as long as the specified condition remains true and then returns the remaining elements.
In this example, we will be skipping the elements in the List till the name “Kathy” and return the remaining elements along with “Kathy”
C#
var p2 = collectionOne.SkipWhile(x => x.Name != "Kathy").ToList();
PrintConsole(p2);
VB.NET
Dim p2 = collectionOne.SkipWhile(Function(x) x.Name <> "Kathy").ToList()
PrintConsole(p2)
Output

Take – The ‘Take’ operator grabs elements to a specified position in the sequence and returns the grabbed elements
In this example, we will grab the first two elements in the List
C#
var p3 = collectionOne.Take(2).ToList();
PrintConsole(p3);
VB.NET
Dim p3 = collectionOne.Take(2).ToList()
PrintConsole(p3)
Output

TakeWhile - The ‘TakeWhile’ operator grabs elements to a specified position in the sequence till the specified condition is true and returns the grabbed elements
In this example, we will grab the elements till ID<=4 in the List
C#
var p4 = collectionOne.TakeWhile(x => x.ID <= 4).ToList();
PrintConsole(p4);
VB.NET
Dim p4 = collectionOne.TakeWhile(Function(x) x.ID <= 4).ToList()
PrintConsole(p4)
Output

Subscribe to:
Posts (Atom)